How To Start A Vegetable Plot , Vegetable Patch or Vegetable Garden
It can seem bewildering at first, but it’s actually surprisingly easy to set up your very own vegetable plot or patch and grow your own yummy veg, imagine the felling of eating fresh that was picked that same day.
Yummy homegrown vegetables …..
It’s important not to take on too much, which is why we encourage people to cultivate relatively small veg beds, but manage them in a way that ensures they’re absolutely chock a block with a wide variety of fresh organic vegetables. Even with just a small plot you’ll be amazed how much you can grow. provided you grow the right varieties, at the right time, in the right way.
If you’re new to growing vegetables, get to grips with more general principles about caring for your plot or patch with this guide. You can find out how to grow specific vegetables in the Vegetable Grow Guides.
Why Start a Vegetable Patch, Plot or Vegetable Garden?
There are several reasons why you should start your own Vegetable Patch, so here’s a list of why you should:
Improving Your Health
Did you know that the nutritional value of vegetables is at it’s highest (has the most amount of vitamins) when you harvest that vegetable. Therefore by eating freshly picked vegetables your extracting the most vitamins into your diet.
You also have the added benefit of knowing the your vegetables haven’t been sprayed with any nasty chemicals.
Outdoor Exercise
Looking after a vegetable patch will keep you on your toes, moving around helping you to burn calories. You will be digging, weeding, planting and watering to name a few tasks. Gardening also helps to keep your mind in check, good mental exercise with all the planning and thought required, when is the time to sow seeds for example.
Save Money
Setting up a vegetable patch is a great way to save money. For example if you buy a pack of 10 tomato seeds for £1.99, you can grow 10 plants that will provide you with well over 100 tomatoes. Or you buy a pack of 5 courgette seeds for £1.99 each plant can provide you with around 20 courgettes. All these vegetables can all be organic, your in control. So you can see there is a lot of savings to be had.
Don’t worry about over producing vegetables, there are a various ways that you can preserve them for use over winter, like pickling, caning and freezing.
Its Good For Your Bones And Helps Relieve Stress
Well as you will be spending loads of time outdoors with your vegetable patch, you will be getting your dose of Vitamin D. A study published in the Journal of Preventive Medicine shows that Vitamin D helps to relieve stress. The NHS states that Vitamin D is vital for healthy bones. Let’s not forget the sense of achievement you get when you see your first vegetable ready for picking.
Great For Kids
Getting your kids to help you with your vegetable patch is a great way for you all to spend some quality time together. Its also a great way to teach them where vegetables come from. Let’s not forget the fact that kids that are actively involved in growing vegetables are more likely to eat them.

Great for kids
Choosing the right location
Lots of Sunshine – Sunshine is essential for growing vegetables, because the sun moves round, most plots will get sunshine for a good proportion of the day, which is perfect for most plants.
But watch out for North facing walls. A plot directly in front of a North facing wall will only catch the sun in the very height of summer – which is inadequate – unless you’re into growing mushrooms.
Consider if your location is close to a water source, last thing you want to do is go back and fourth all day long carrying a water can.
Vegetable Beds – Sizes and Shapes
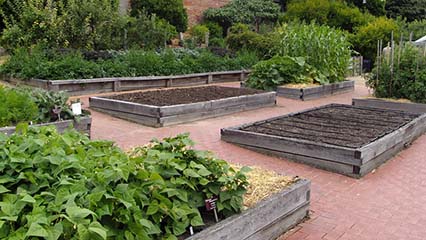
The veg beds in your plot design will generally be 4ft wide and 8ft long (1.21m wide by 2.43m long). We’ve found this to be the perfect size. It means you can easily reach across the soil without stepping on it, to sow, grow and harvest.
Paths are 2ft wide (0.61m wide). Any narrower than this and you’ll find yourself in all kinds of weird contorted positions as you try to navigate between your beds. Better to give yourself a generous amount of space so you can tend your plot with ease.
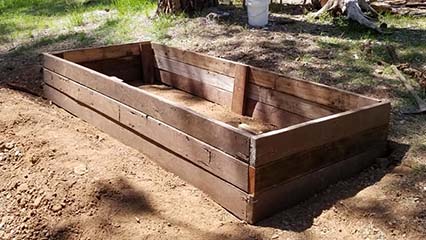
We turn our beds into ‘raised beds’, which essentially means a wooden surround made from planks of wood.
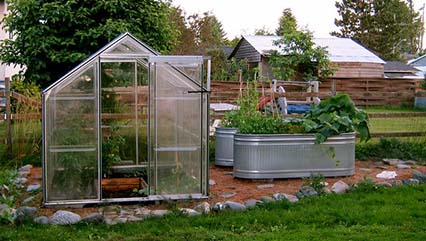
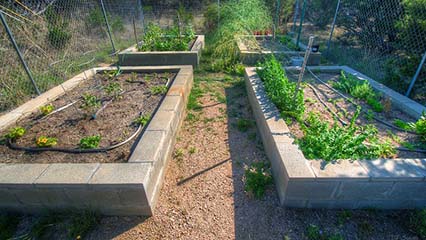
They look great and make managing your plot much simpler. These can be constructed out of timber available from your local DIY shop. Opt for plain timber and treat it yourself with a preservative, or a simpler method is to buy pressure treated or ‘Tannalised E’ timber. Historically this treatment involved impregnating timber with copper, chrome and arsenic – not good stuff to have around food! Now the treatment is only copper based, and because it’s applied under pressure it won’t leach into your soil. You can make them out of concrete blocks, sandbags, logs and even stones if you wish to instead and are just bound by your imagination, just remember 2 simple rules
- It must be able to hold soil
- Must not leach any chemicals into the soil
Otherwise just mark out your beds with a small stake or cane at each corner so you know where to walk, and where your plants should start.
Have a look at the images below for some example raised beds:
Pack your soil full of goodness
Preparing your soil can be a bit of a chore, but creating soil rich in nutrients and organic matter is the key to a successful veg patch. Plants will grow faster and produce a much bigger crop. You’ll be very glad you did it once summer arrives and you’re reaping the bounty!
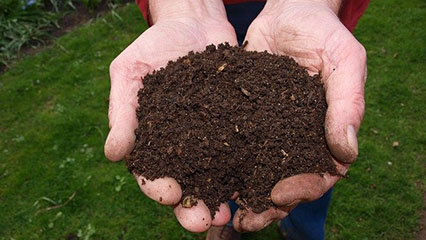
For each 8ft x 4ft bed add at least one 150L bag of general purpose compost from your local DIY shop. Homemade compost or farmyard manure is also perfect. Spread it on the top of your bed and mix the whole together with your soil using a spade. It’s a good idea to sprinkle on a little organic fertiliser at the same time.
Let nature do the watering
The compost added to your soil will also act as a reservoir storing up rainwater and releasing it in dry spells, so you won’t need to water your plot unless it is very dry. In which case get the hose out and drench it. You want to ensure water percolates very deep into the soil to encourage roots to head down.
Take out weeds
Once your veg is up and running there will be little room for weeds to grow so you won’t have much of a problem.
Earlier on there’s bit more work to do. If you’re using the ground for the first time there will probably be ‘perennial’ weeds growing in it. These include things like stinging nettles, bindweed, couch grass etc. that will grow back year after year. Most have thick white roots (2mm or more generally). You need to get these out. The best way to do this is to dig the soil with a fork, breaking up lumps as you go and teasing these wicked white roots and dumping them well away from your plot.
Even small sections of root left behind can regenerate new plants, but once they’re gone you won’t have to dig your soil ever again! Spread compost/manure on your beds every Autumn for the worms to take in and avoid compacting your soil by walking it, and the digging’s over.
‘Annual’ weeds are much easier to deal with than perennial weeds. They grow from seed every year, and every time you dig your soil you’ll be bringing dormant seeds to the surface that will be triggered into life by sunlight. They consume light, water and nutrients intended for your vegetables, so kill these off when they’re small by going over them with a sharp hoe, or pulling out by hand. The loose structure of your un-trampled soil will make it easy to pull them out.
Pay particular attention to the vegetable seeds you’ve sown directly in the soil. They can easily disappear amongst a fresh crop of annual weeds, so weed around them regularly.
Make slugs and snails your enemies
Slugs and snails spend their lives hoovering up succulent leaves and stems. Your veg is a prime target, especially young juicy seedlings. They can make your life a misery. So, take direct action!
The easiest way of dealing with them is slug pellets. Traditional slug pellets are blamed for killing birds, hedgehogs etc. All of which is probably true. That’s why it’s essential you use the organic slug pellets. They’re a new generation product that’s only been around a couple of years that has no harmful effects on wildlife, and will eventually break down into soil nutrients.
Another method that we use to control slugs and snails is by using egg shell. Simply wash your egg shells start saving them in a bag, once you have enough eggshells you just crush them up and sprinkle the crushed eggshells around your plants. Slugs and snails hate the feeling of crushed eggshells and so will avoid them.
Always keep a sprinkling of slug pellets or crushed eggshells around young seedlings and recently planted out plants.
Once they’ve grown a bit, they should be able to fend for themselves. It’s also always worth combing your plants every now and again to pull them off by hand. Offer children 10p for every one they find… depending on how mean you are!
Timings and Spacings
Each variety of vegetable has specific sowing requirements. Get it wrong and your plants can be wiped out by frosts, become infested with bugs, or both! It can become complicated when you’re growing a variety of different veg. That’s why it’s important to know when vegetables need to be sown.
Put your plants at the wrong spacings and they will either grow tall and spindly, or you’ll end up wasting valuable bed space. As a good rule of thumb the vast majority of plants have 12in (30cm) between rows – that’s about the length of a trowel. Bigger plants like courgettes need 2ft (60cm) between plants. You’ll find all the specific spacing information you need in the Grow Guides that we create.
Starting plants off inside
Most plants can be sown directly into your soil, but those that originate from warmer climates like Tomatoes and Courgettes need to be started off inside so they’re not damaged by frost.
We sow these seeds in rootrainers (deeper seed trays than normal). They’re very easy to use. Just fill the cells with multipurpose compost that you can buy in any DIY store, pop in your seeds, cover with a layer of compost and water gently.
Once you’ve sown your seeds, place the trays on a sunny windowsill and water about once a week. Aim to keep the compost moist, but don’t let it get waterlogged. It’s essential your plants have small pockets of air in their compost to feed on.
The clear plastic drip tray can double up as a cover to keep the surface of the compost moist and your freshly sown seeds moist. I generally remove the cover and use it as a base once my seedlings emerge. Put the rootrainer on a sunny windowsill, in a conservatory, or in a greenhouse if you have one. If you have none of the these you might want to invest in a Plant House, which is essentially a mini greenhouse.
Transfer your frost-delicate plants outside at the end of April or May when the chance of frost is well and truly behind us.
Sowing in Gutters
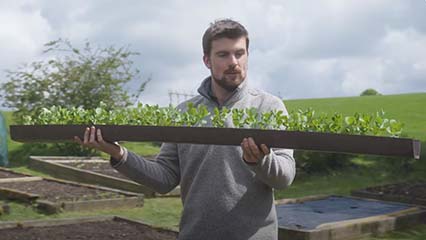
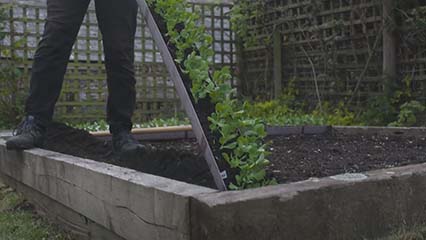
I sow some of my plants in gutters before moving them to my vegetable plot / patch. They’re really convenient for peas, and leaf’s like lettuce and swiss chard that need to grow at quite wide (12in or 30cm) spacings.
Sow in a gutter and you can raise a lot of seedlings in a small area, free from competition from weeds. Once the plants are established, they can be eased out from the gutter individually, or as a group, into their final growing position. Remember to soak the compost in the gutter beforehand and the plants will slide out very easily.
They’re also ideal for follow on crops if you’re short of bed space. Seedlings can be raised in a gutter and then slotted into your plot when they’re 3-4in high (7 – 10cm high), as and where space has come available from plants that you’ve harvested.
Labelling
Right after sowing any seeds, put a label in, otherwise it’s very easy to forget what’s gone where. Write on labels with a pencil and then you can scrub the writing off, and re-use again next year.

